หน้าเว็บ

วันอังคารที่ 31 มกราคม พ.ศ. 2560

Zimbra : Zimbra Delete All Email Contract All User.

Zimbra : Zimbra Delete All Email Contract All User.
Zimbra มีปัญหา จำ Email Contract เดิม ซึ่งแสดงชื่อตำแหน่งไม่ถูกต้อง จะต้องลบ Email Contract ของแต่ละ User ออก และ Reset RankingActionRequest เพื่อให้ Zimbra เรียนรู้ และจำ Contract ใหม่

** ใช้ Code นี้ Contract และ Contract Group ที่สร้างขึ้นเองยังอยู่ **

1. สร้างไฟล์ bash .sh สำหรับ Run คำสั่ง
https://forums.zimbra.org/viewtopic.php?t=28905

  1. #!/bin/bash
  2.  
  3. #for foo in `cat /usr/local/scripts/users.txt`
  4. #File User We Do It.
  5. for foo in `cat /home/sa/users.txt`
  6. do
  7.         echo $foo
  8.         echo "Verifting contacts from user $foo" >> /tmp/purge_emailed_contacts_log.txt
  9.  
  10.         /opt/zimbra/bin/zmmailbox -z -m $foo gact -f "/Emailed Contacts" | grep Id: | cut -d" " -f2 > /tmp/verContactos.txt
  11.         for contacto in `cat /tmp/verContactos.txt`
  12.         do
  13.                 /opt/zimbra/bin/zmmailbox -z -m $foo gct $contacto | grep email > /tmp/contacto_a_examinar.txt
  14.                 RESP=`grep sci.com /tmp/contacto_a_examinar.txt`
  15.                 if [ ${#RESP} -gt 1 ]
  16.                 then
  17.                         echo "Local Contact"
  18.                         echo "Deleting contact $RESP"
  19.                         /opt/zimbra/bin/zmmailbox -z -m $foo dct $contacto
  20.                         echo "Contact $RESP with ID $contacto has been deletec from account $foo" >> /tmp/purge_emailed_contacts_log.txt
  21.                         echo ""
  22.                 fi
  23.         done
  24.  
  25. /opt/zimbra/bin/zmsoap -z -m $foo RankingActionRequest/action @op=reset
  26. /opt/zimbra/bin/zmprov fc account $foo
  27.  
  28. done


2. นำไฟล์ User มาใส่ txt รูปแบบ เอา User มาเรียง เช่น


เอา User ที่เป็น Admin และพวกป้องกัน Virus , Spam ออก ให้เหลือเฉพาะ User ที่จะใช้งานจริง ๆ
https://community.bittitan.com/kb/Pages/How%20do%20I%20export%20a%20user%20list%20from%20Zimbra%20into%20a%20CSV%20file.aspx

https://wiki.zimbra.com/wiki/Reset_contact_Autocomplete_ranking

https://wiki.zimbra.com/wiki/King0770-Notes-Removal_of_Bad_Contact_Address

วันอังคารที่ 24 มกราคม พ.ศ. 2560

Ubuntu : Ubuntu 16.04 cacher-ng for update upgrade

Ubuntu : Ubuntu 16.04 cacher-ng for update upgrade
- ติดตั้ง
  1. sudo apt-get install apt-cacher-ng


- snap เครื่องเดิม เพื่อเอา disk cache ไปใส่เครื่องใหม่
- download file vmdk
จะได้ไฟล์ 2 ไฟล์ .vmdk และ flat.vmdk
- upload ขึ้น folder ที่ต้องการ
- add disk ใส่ VMware
- ดู disk ว่าได้ dev อะไร
  1. fdisk -l

- สร้าง folder สำหรับ mount disk ใส่
  1. mkdir /cache-ng

- mount disk ใส่ /cache-ng
  1. mount /dev/sdc1/ /cache-ng

- auto mount
  1. nano /etc/fstab

เพิ่ม Code
  1. /dev/sdc1 /cache-ng    ext4    defaults         0       0


-แก้ไฟลื acng.conf เพื่อให้ไปใช้งาน disk cache-ng
  1. nano /etc/apt-cacher-ng/acng.conf

แก้
  1. CacheDir: /cache-ng/apt-cacher-ng
  2. Port:9999


- restart service
  1. /etc/init.d/apt-cacher-ng restart


ทดลองแก้ เครื่องอื่น
  1. nano /etc/apt/apt.conf

ใส่ ip ใหม่
  1. Acquire::http { Proxy "http://192.168.2.116:9999"; };

แล้วทดลอง update upgrade ดู

Lightsquid : Lightsquid On Ubuntu 16.04

Lightsquid : Lightsquid On Ubuntu 16.04
ต่อจากติดตั้ง Squid Proxy เสร็จ
http://porpramarn.blogspot.com/2017/01/proxy-ubuntu-1604-squid.html
ติดตั้ง Lightsquid ต่อเพื่อไว้ดูรายงานต่าง ๆ
- downlosd
http://sourceforge.net/projects/lightsquid/files/lightsquid/lightsquid-1.8.tgz

- เอาไว้ทีเครื่องอื่น แล้ว scp หรือ wget เอา
- cd เข้าไปใน Folder ที่ มีไฟล์ ightsquid-1.8.tgz
แตกไฟล์
  1. tar xvzf lightsquid-1.8.tgz

move file ไปไว้ที่ /usr/local/lightsquid
  1. mv lightsquid-1.8 /usr/local/lightsquid

- แก้ lightsquid.cfg
  1. nano /usr/local/lightsquid/lightsquid.cfg

แก้ Path
  1. #path to additional `cfg` files
  2. $cfgpath             ="/var/local/lightsquid";
  3. #path to `tpl` folder
  4. $tplpath             ="/usr/local/lightsquid/tpl";
  5. #path to `lang` folder
  6. $langpath            ="/usr/local/lightsquid/lang";
  7. #path to `report` folder
  8. $reportpath          ="/usr/local/lightsquid/report";
  9. #path to access.log
  10. $logpath             ="/var/log/squid";
  11. #path to `ip2name` folder
  12. $ip2namepath         ="/usr/local/lightsquid/ip2name";
  13.  
  14. $skipurl             = 'sci\.com|192\.168\.2\.';


- check ว่ามี error หรือไม่
  1. /usr/local/lightsquid/check-setup.pl


- สร้าง Link เข้า Web
  1. nano /etc/apache2/conf-available/lightsquid.conf

ใส่ Code เข้าไป
  1. Alias /lightsquid /usr/local/lightsquid/
  2.  
  3. <Directory "/usr/local/lightsquid/">
  4.     Options +Indexes +ExecCGI
  5.     AddHandler cgi-script .cgi .pl
  6.     AllowOverride All
  7.     Order allow,deny
  8.     Allow from all
  9.     Require all granted
  10. </Directory>


- Test เข้า lightsquid ip/lighsquid
  1. 192.168.2.116/lighsquid


Error
client denied by server configuration: /usr/local/lightsquid/

ต้อง run คำสั่ง
  1. a2enmod cgi
  2. a2enconf lightsquid
  3. systemctl restart apache2


- Test เข้า lightsquid ip/lighsquid
  1. 192.168.2.116/lighsquid


Error
Can't locate CGI.pm in @INC (you may need to install the CGI module) (@INC contains: /etc/perl /usr/local/lib/x86_64-linux-gnu/perl/5.22.1 /usr/local/share/perl/5.22.1 /usr/lib/x86_64-linux-gnu/perl5/5.22 /usr/share/perl5 /usr/lib/x86_64-linux-gnu/perl/5.22 /usr/share/perl/5.22 /usr/local/lib/site_perl /usr/lib/x86_64-linux-gnu/perl-base .) at /usr/local/lightsquid/index.cgi line 19. BEGIN failed--compilation aborted at /usr/local/lightsquid/index.cgi line 19.


ต้องติดตั้งโปรแกรมเพิ่มเติม
  1. apt-get install libcgi-pm-perl


Thank This Web : https://www.mail-archive.com/debian-bugs-dist@lists.debian.org/msg1410241.html
- Restart apache2
- Test เข้า lightsquid ip/lighsquid

จะเข้าดูได้ ถ้าเข้าไม่ได้ ดู log ว่า Error อะไรใช้คำสั่ง
  1. tail /var/log/apache2/error.log


- ถ้าต้องการดู Graph ด้วย อาจจำเป็นต้องติดตั้ง GD.PM เพิ่มเติมด้วยคำสั่ง
  1. apt-get install libgd-gd2-perl


- ถ้าไม่ต้องการ ให้แก้ $graphreport ใน lightsquid.cfg เป็น
  1. $graphreport = 0


- Generate report
  1. /usr/local/lightsquid/lightparser.pl


- Test เข้า lightsquid ip/lighsquid
- Generate report ทุกวัน
  1. crontab -e

เพิ่ม Code
  1. 0 0 * * * /usr/local/lightsquid/lightparser.pl

หรือ
  1. @daily /usr/local/lightsquid/lightparser.pl


เสร็จการติดตั้ง Lightsquid on ubuntu 16.04

- copy report จากเครื่องเดิม มาใส่เครื่องใหม่ จะได้มีข้อมูลเก่าไว้ดู
ที่เครื่องเก่า
  1. cd /usr/local/lightsquid

scp ทั้งหมด folder report
  1. scp -r report/ sa@192.168.2.116:/home/sa


ที่เครื่องใหม่
- copy folder report ไปไว้ใน /usr/local/lightsquid/
  1. cp -r report/ /usr/local/lightsquid/


- เข้าดู lightsquid จะมีข้อมูลเก่าขึ้นมา
http://192.168.2.116/lightsquid/index.cgi

- copy folder it และไฟล์ it*.* ที่อยู่ใน folder lightsquid จากเครื่องเก่าไปเครื่องใหม่ เพื่อเข้าดูหน้า CHECK IP ว่าชื่อใครมีใช้ที่ ip ใดบ้าง
ที่เครื่องเก่า
  1. scp -r it/ sa@192.168.2.116:/home/sa

  1. scp it* sa@192.168.2.116:/home/sa


ที่เครื่องใหม่ copy ไฟล์เข้าไปไว้ /usr/local/lightsquid/
  1. cp -r it/ /usr/local/lightsquid/

  1. cp it* /usr/local/lightsquid/

- cd เข้า folder lightsquid
  1. cd /usr/local/lightsquid/

http://porpramarn.blogspot.com/2016/11/lightsquid-edit-file-and-use-phpmysql.html

- แก้ไฟล์ html สำหรับแสดงผลหน้า web ที่ /usr/local/lightsquid/tpl/base เพิ่มข้อความแก้ไขรูปแบบของ html
เช่น index.html เพื่อให้มี link คลิกไปดูหน้า php ที่สร้างขึ้นได้ เพิ่ม
  1. <TD width="33%" align="center"><FONT size="-1"><A HREF="it.php">CHECK IP</A></FONT></TD>


- ที่ folder ip2name ให้ copy ไฟล์ ip2name.simple --> ip2name.simpleNew แก้ Code เป็นดังนี้เพื่อให้ Show IP และชื่อร่วมกัน (ไม่ใช้ไฟล์เดิมร่วมกันเพราะมีปัญหาเรื่อง Link และไม่สามารถดูภาพรวมทั้งหมดเฉพาะชื่อได้จึงต้องแยก)
  1. #contributor: esl
  2. #do nothing
  3. #simple version
  4.  
  5. sub StartIp2Name() {
  6. }
  7.  
  8. sub Ip2Name($$$) {
  9.   # $Lhost,$user,$Ltimestamp
  10.   my $Lhost=shift;
  11.   my $user =shift;
  12.   #return $user.":".$Lhost
  13.   return $user.":".$Lhost if ($user ne "-"); #return user if defined !!!!!
  14.   #return $user if ($user ne "-"); #return user if defined !!!!!
  15.   return $Lhost;
  16. }
  17.  
  18. sub StopIp2Name() {
  19. }
  20.  
  21. #warning !!!
  22. 1;


- Run คำสั่ง สร้าง Report โดยใช้คำสั่ง
/usr/local/lightsquid/it_lightparser.pl

- นำคำสั่งไปใส่ใน crontab -e เพื่อจะให้ run auto กำหนดวันตามที่เราต้องการ เช่น
  1. 0 0,13 * * * /usr/local/lightsquid/it_lightparser.pl


-ติดตั้ง mysql
  1. sudo apt-get install mysql-server


- ติดตั้ง phpmyadmin และ Program ที่ต้องใช้ร่วมกับ phpmyadmin
  1. sudo apt-get install phpmyadmin php-mbstring php-gettext


- เข้า phpmyadmin สร้าง database it_report แล้วนำ database จากเครื่องเก่ามา imports เข้า
ถ้าไม่มีข้อมูลหรือไม่แสดงผล หรือมี error ต่าง ๆ ให้เข้าดู log ของ apache2
  1. tail /var/log/apache2/error.log

แล้วแก้ตามที่มี error เช่น คำสั่ง split ใช้งานไม่ได้แล้วให้แก้เป็น explode แทน
แล้วทดลองเข้า http://192.168.2.116/lightsquid/it.php

Proxy : Ubuntu 16.04 Squid

Proxy : Ubuntu 16.04 Squid
- ติดต้้่ง 16.04 Server set apt.conf update upgrade ให้เรียบร้อย
  1. apt nano /etc/apt/apt.conf

Acquire::http { Proxy "http://192.168.2.16:9999"; };
  1. apt-get update
  1. apt-get upgrade


- Generate locale perl: warning
  1. locale-gen en_US en_US.UTF-8 th_TH th_TH.UTF-8


- ติดตั้ง โปรแกรม
  1. apt-get install squid3
  1. apt-get install apache2


- join domain
  1. apt-get install krb5-user samba winbind


- แก้ไฟล์ krb5.conf
  1. nano /etc/krb5.conf

แทนที่ทั้งหมด
  1. [logging]
  2. default = FILE:/var/log/krb5.log
  3. [libdefaults]
  4. ticket_lifetime = 24000
  5. clock_skew = 300
  6. default_realm = SCI.COM
  7. krb4_config = /etc/krb.conf
  8. krb4_realms = /etc/krb.realms
  9. kdc_timesync = 1
  10. ccache_type = 4
  11. forwardable = true
  12. proxiable = true
  13. default_tgs_enctypes = aes256-cts arcfour-hmac-md5 des3-hmac-sha1 des-cbc-crc des-cbc-md5
  14. default_tkt_enctypes = aes256-cts arcfour-hmac-md5 des3-hmac-sha1 des-cbc-crc des-cbc-md5
  15. v4_instance_resolve = false
  16. v4_name_convert = {
  17. host = {
  18. rcmd = host
  19. ftp = ftp
  20. }
  21. plain = {
  22. something = something-else
  23. }
  24. }
  25. fcc-mit-ticketflags = true
  26. [realms]
  27. SCI.COM = {
  28. kdc = dc01.sci.com
  29. admin_server = dc01.sci.com
  30. default_domain = SCI.COM
  31. }
  32. [domain_realm]
  33. .sci.com = SCI.COM
  34. sci.com = SCI.COM
  35. [login]
  36. krb4_convert = true
  37. krb4_get_tickets = false
  38.  


- แก้ไฟล์ smb.conf
  1. nano /etc/samba/smb.conf

แทนที่ทั้งหมด
  1. [global]
  2. security = ads
  3. realm = SCI.COM
  4. password server = dc01.sci.com
  5. workgroup = SCI
  6. idmap uid = 10000-20000
  7. idmap gid = 10000-20000
  8. winbind enum users = yes
  9. winbind enum groups = yes
  10. template homedir = /home/%U
  11. template shell = /bin/bash
  12. client use spnego = yes
  13. client ntlmv2 auth = yes
  14. encrypt passwords = yes
  15. winbind use default domain = yes
  16. restrict anonymous = 2
  17. map acl inherit = yes
  18. nt acl support = yes
  19. disable spoolss = yes
  20. wins server = 192.168.0.253
  21.  


- join domain ด้วยคำสั่ง
  1. net rpc join ads SCI.COM -S dc01.sci.com -U Administrator

หรือ
  1. net ads join SCI.COM -S dc01.sci.com -U Administrator


- restart service
  1. /etc/init.d/smbd restart 
  1. /etc/init.d/winbind restart


- test kerberos
  1. kinit Administrator@SCI.COM  #domain ใช้ตัวพิมพ์ใหญ่
  2.     klist

ควรจะได้ผลลัพธ์ ประมาณนี้
Ticket cache: FILE:/tmp/krb5cc_0
Default principal: Administrator@SCI.COM

Valid starting Expires Service principal
02/24/11 13:31:44 02/24/11 20:11:44 krbtgt/SCI.COM@SCI.COM


- get group get user
  1. wbinfo -u
#แสดงรายการ user ใน domain
  1. wbinfo -g
#แสดงรายการ group ใน domain

- get password get group AD
  1. getent passwd
#จะเห็นรายชื่อบน AD
  1. getent group
#จะเห็น group บน AD

- แก้ squid.conf
  1. nano /etc/squid/squid.conf

copy config บางส่วนที่ใช้ block มา จากเครื่องเดิม

แก้ squid บางส่วน
  1. acl localnet src 192.168.0.0/24 192.168.100.0/24
  2. http_access allow localnet
  3. http_port 8080
  4.  


ส่วนของ Authentication แก้เป็นดังนี้ ส่วนที่ต่างจาก Version เก่า คือสีแดง
  1. auth_param basic program /usr/lib/squid3/basic_ldap_auth -R -b "dc=sci,dc=com" -D "cn=ldap-user,cn=Users,dc=sci,dc=com" -w "password" -f "sAMAccountName=%s" -h 192.168.0.254
  2.     auth_param basic children 5
  3.     auth_param basic realm Squid proxy-caching web server
  4.     auth_param basic credentialsttl 5 minutes


  1. external_acl_type InetGroup %LOGIN /usr/lib/squid3/ext_wbinfo_group_acl
  2. acl InetAccess external InetGroup InetAllow
  3. http_access allow InetAccess

  1. acl webblocked url_regex '/etc/squid/webblocked.txt'
  2. acl day_am time 08:00-12:00
  3. acl day_pm time 13:00-17:40
  4. http_access deny webblocked day_am
  5. http_access deny webblocked day_pm


- copy พวกไฟล์ webblocked.txt จากเครื่องเดิมมา

- restart service
  1. /etc/init.d/squid restart


- test Authen ว่าผ่านหรือไม่
  1. echo "suwit_j InetAllow" | /usr/lib/squid/ext_wbinfo_group_acl -d

ต้องได้ผลลัพท์แบบนี้
Debugging mode ON.
Got suwit_j InetAllow from squid
User: -suwit_j-
Group: -InetAllow-
SID: -S-1-5-21-2702268678-3437982827-1986072043-3107-
GID: -10019-
Sending OK to squid
OK


- Test Set proxy on browser.

นำ Cache จากเครื่องเดิมมาใช้งานต่อ
- snap เครื่องเดิม เพื่อเอา disk cache ไปใส่เครื่องใหม่
- download file vmdk
จะได้ไฟล์ 2 ไฟล์ .vmdk และ flat.vmdk
- upload ขึ้น folder ที่ต้องการ
- add disk ใส่ VMware
- ดู disk dev อะไร
  1. fdisk -l

- สร้าง folder สำหรับ mount disk cache
  1. mkdir /cache

- mount disk ใส่ /cache
  1. mount /dev/sdb1 /cache

- mount auto
  1. nano /etc/fstab
  1. /dev/sdb1 /cache reiserfs notail,noatime 1 2


- แก้ squid.conf
  1. nano /etc/squid/squid.conf

เพิ่ม
  1. cache_dir ufs /cache 10240 32 512
  2. cache_mem 64 MB
  3.  
  4. #cache_effective_user proxy
  5. #cache_effective_group proxy
  6.  
  7. maximum_object_size 64 MB
  8. maximum_object_size_in_memory 64 KB
  9.  
  10. memory_replacement_policy heap LFUDA
  11. cache_replacement_policy heap LFUDA


-restar service
  1. /etc/init.d/squid restart


- gen reports แล้วดู lightsquid ที่มี hit ว่ามีการใช้งานหรือไม่ถ้ามี แสดงว่าใช้งานจาก cache
  1. /usr/local/lightsquid/lightparser.pl

วันพุธที่ 18 มกราคม พ.ศ. 2560

Ubuntu : Ubuntu Backup To External Box.

Ubuntu : Ubuntu Backup To External Box.
1. สร้าง Folder สำหรับ mount box ใส่
  1. mkdir /mnt/USB


2. ต่อ USB External Box. แล้วดู ว่าได้ dev ที่เท่าไหร่ เช่น /dev/sda1, /dev/sda2 ,/dev/sdc1 ......
  1. fdisk -l


3. ใช้คำสั่ง Mount External Box ใส่ Folder ที่สร้างขึ้น เพื่อใช้งาน sdc1 ขึ้นอยู่กับ dev ที่ได้ในข้อ 2.
  1. mount -t ntfs-3g /dev/sdc1 /mnt/USB


4. แก้ไข้ Code ที่ใช้ Backup ใส dev ที่ได้จากข้อ 2.
  1. nano /DATA/backup-full.sh

  1. ###### Edit dev when dev dive change #######
  2. mount -t ntfs-3g /dev/sdc1 /mnt/USB


5. จะถอด External Box ต้องใช้คำสั่ง ก่อนถอด External Box
  1. umount /mnt/USB

วันอังคารที่ 10 มกราคม พ.ศ. 2560

Scanner : Scanner Brother ADS-1100w FTP Function To Ubuntu

Scanner : Scanner Brother ADS-1100w FTP Function To Ubuntu
1. ติดตั้ง FTP ที่ Ubuntu Server ในที่นี้ใช้ Dataserver ซึ่งมีการใช้งาน Kerberos เพื่อดึงชื่อจาก AD จึ่งไม่สามารถสร้าง User และ เปลี่ยนรหัสผ่าน ได้ จึงต้องใช้ User จาก AD เพื่อใช้เป็น User สำหรับ FTP เลย
แต่ถ้า ไม่มีการใช้งาน Samba สามารถสร้าง User FTP เองได้เลย ตามนี้
http://porpramarn.blogspot.com/2016/06/ubuntu-ftp.html

(Dataserver)
รหัสผ่าน และ User ใช้จาก AD ได้เลย
2. add user สร้าง home และ chown
  1. sudo useradd -d /home/user1 user1
  2. sudo mkdir /home/user1
  3. sudo chown user1 /home/user1


3. สร้าง Folder SCAN ไว้ใน home/user
  1. sudo mkdir /home/user1/SCAN


4. เปลี่ยนสิทธิ์ Folder SCAN ให้เป็น 770 และกำหนดสิทธิ์ให้กับ Group ที่ต้องการให้เข้าและแก้ไขได้ และ Set ให้ไฟล์ข้างในได้สิทธิ์ตาม Folder หลัก
  1. chmod 770 /home/user1/SCAN
  2. chgrp -R if /home/user1/SCAN/
  3. chmod g+s SCAN/

มีปัญหา สิทธิ์ที่ไฟล์ PDF ที่ FTP มา ทำให้ User อื่น เปิดลบ ไม่ได้ แก้โดย
  1. cd /home/user1/SCAN/
  2. nano .cronChmod.sh
  3. chmod 777 .cronChmod.sh

ใส่ Code ให้ Run chmod ทุก ๆ 5 วินาที
  1. #!/bin/bash
  2. while true
  3. do
  4.  chmod 770 /home/suwit_j/SCAN/*.pdf
  5.  sleep 5
  6. done


ใช้ nohup ให้ Run เป็น Background คำสั่ง nohup http://linux.101hacks.com/unix/nohup-command/
  1. nohup /home/suwit_j/SCAN/.cronChmod.sh &


ใช้คำสั่ง ดูว่ามีการทำงานอยู่หรือไม่
  1. ps aus 
หยุดการทำงานด้วยการ kill proces
  1. kill -9 29187

5. shared folder เพื่อให้ User ใน IF เข้ามาเอาไฟล์ และลบได้ทิ้งได้
  1. nano /etc/samba/smb.conf

เพิ่ม Code
  1. [SCAN]
  2. comment = Folder SCAN FTP
  3. writeable = yes
  4. path = /home/suwit_j/SCAN
  5. delete readonly = yes
  6. force create mode = 770
  7. force directory mode = 770
  8. directory mode = 770
  9. create mode = 770


6. restart samba
  1. /etc/init.d/samba restart


7. เข้า IP ของเครื่อง Brother ADS-1100W (.33)
เข้าไปที่ Scan to FTP Profile -- > Profile 1

8. สร้าง Profile ตามที่ต้องการ โดย Username ใส่ ตามที่เราสร้างใน ข้อ 2.
ใส่ Directory ตามที่เราสร้างในข้อ 3. แล้วกด Submit

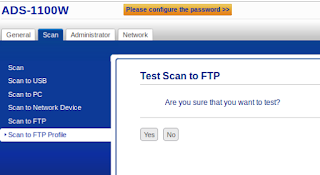
9. กด Yes เพื่อ Test FTP
10. ถ้า Test ผ่าน จะมีข้อความว่า Test OK ถ้าไม่ผ่านจะมี Error สีแดงแก้ไขตามที่ Error
11. ไปที่ Menu Scan to Network Device เลือก Type เป็น Scan To FTP และ Destination เป็นชื่อ Profile ที่เราสร้างขึ้น แล้วกด submit

12. ที่เครื่องจะมีไฟรูปคอม1 ขึ้น ทดลอง Scan และทดลองเข้าไปเอาไฟล์ ผ่าน Server ทดลองสิทธิ์ในการเข้าถึง
ตามที่กำหนดไว้ในข้อ 4.


** หรือจะใช้วิธีใหม่ แบบไม่ต้องเช็ค Run ทุก 5 วินาที ในไฟล์ batch **
แก้ไขใหม่ ใช้ setfacl ที่ Folder เพื่อให้ไฟล์ภายในได้ตามสิทธิ์ที่ Folder สร้างขึ้น
และสร้าง User ใหม่ ที่ AD ads1100w
setfacl -m g:if:rwx /home/ads1100w/SCAN
setfacl -d -m g:if:rwx /home/ads1100w/SCAN
chomod g+s /home/ads1100w/SCAN

ยกเลิกการ Run batch เช็คเวลา


วันจันทร์ที่ 9 มกราคม พ.ศ. 2560

VMware : ติดตั้ง VMware Tools แบบ CLI

VMware : ติดตั้ง VMware Tools แบบ CLI
Ubuntu Server with only a command line interface
1.Go to Virtual Machine > Install VMware Tools (or VM > Install VMware Tools).
Note: If you are running the light version of Fusion, or a version of Workstation without VMware Tools, or VMware Player, you are prompted to download the Tools before they can be installed. Click Download Now to begin the download.

2.In the Ubuntu guest, run these commands:
Create a directory to mount the CD-ROM by running the command:

  1. sudo mkdir /mnt/cdrom

When prompted for a password, enter your Ubuntu admin user password.
Note: For security reasons, the typed password is not displayed. You do not need to enter your password again for the next five minutes.

Mount the CD-ROM by running the command:
  1. sudo mount /dev/cdrom /mnt/cdrom or sudo mount /dev/sr0 /mnt/cdrom


The file name of the VMware Tools bundle varies depending on your version of the VMware product. Run this command to find the exact name:
  1. ls /mnt/cdrom

Extract the contents of the VMware Tools bundle by running the command:
  1. tar xzvf /mnt/cdrom/VMwareTools-x.x.x-xxxx.tar.gz -C /tmp/


Note: x.x.x-xxxx is the version discovered in the previous step.

Change directories into the VMware Tools distribution by running the command:
  1. cd /tmp/vmware-tools-distrib/


Install VMware Tools by running the command:
  1. sudo ./vmware-install.pl -d

Note: The -d switch assumes that you want to accept the defaults. If you do not use -d, press Return to accept each default or supply your own answers.

Run this command to reboot the virtual machine after the installation completes:
  1. sudo reboot


http://kb.vmware.com/selfservice/microsites/search.do?language=en_US&cmd=displayKC&externalId=1022525

Modbus : Actuator controls AUMATIC Modbus

Modbus : Actuator controls AUMATIC Modbus
1. ซ่อมบำรุงต่อสายไฟ ประกอบให้เสร็จ
2. ต้องมีสายสัญญาณ , สาย USB , และกล่องแปลงสัญญาณ ICPCON 7561
3. ต่อสาย DATA+ และ DATA- ที่ ICPCON ตามรูป

Port 1 และ 2
4. พ่วงสาย USB เข้า Computer และติดตั้ง Driver USB (Windows7 Update ผ่าน Internet ได้เลย) ต้องลอง Driver ให้ได้ถึงจะใช้งานได้
หรือ Download Driver ได้ที่ ftp://ftp.icpdas.com/pub/cd/8000cd/napdos/7000/756x/vista_32_64bit_win7_32_64bit/
5. Download Program AUMA CDT และติดตั้งโปรแกรม รองรับ (Windows 7, Windows 10) ที่
https://www.auma.com/en/service-support/software/auma-cdt/
6. ตั้งค่า Address ที่เครื่อง Actuator (ซ่อมบำรุงทำเป็น) สามารถดูเพิ่มเติมได้จากคู่มือที่แนบมากับ Actuator
คราว ๆ ดังนี้
- กด Reset ค้างไว้ --> Customer Settings ---> Modbus ---> MD1 Slave address กด Enter กด ใส่รหัส 0000 ด้วยการ Enter 4 ครั้ง
เลือกเลขเป็น 246, 247, 248 ....... ตามที่เราต้องการตั้ง Address ให้กับเครื่อง กด Enter เพื่อ Save
จะตั้ง Address ได้ ต้อง บิด Switch ไปที่ เลข 0 ก่อน (ถ้าไม่บิดไปจะตั้งค่าไม่ได้)
ถ้าต้องการ Control ที่หน้าเครื่องให้ บิด Switch ชี้ขึ้นข้างบน
ถ้าต้องการ Control ผ่าน Computer ผ่าน Program ให้บิด Switch ชี้ลงข้างล่าง

- อีกที่คือ Baud rate ช่วงสัญญาณ ถ้าใกล้ ๆ ปกติจะ Set เป็น 9.6 kb แต่ถ้าสายไกล ๆ ค่อย Set เป็น 11.5 kb
- ที่เดิมเป็น Even ให้เลือกเป็นอันที่ 2 Not 1 Stop bit
ประมาณนี้
ปุ่ม ควบคุมดังนี้

7. เปิดโปรแกรม AUMA CDT เลือก เครื่องเป็น AC.2 เข้า Menu Login

8. เลือก User เป็น Operator (2) และใส่ Password เป็น 0000

9. เข้า Menu Tools เลือก Options
10. เลือก Tab Connections เป็น Modbus แล้วกด OK

11. เข้า Menu Tools เลือก Modbus
12. กด OK
13. เลือก COM Port ให้ตรงกับ Driver ที่เราลงในข้อ 4.
เลือก Baud rate ให้ตรงกับเครื่อง ที่ Set ไว้ในข้อ 6.
เลือก Parity เป็น None
เลือก Stop bits เป็น One
แล้วกด OK

14. รอจนกว่าจะเจอ Address ที่เราตั้งไว้ แล้วกด OK
15. โปรแกรมจะ Show ค่าต่าง ๆ พื้นฐานของเครื่อง

16. การใช้งานเบื้องต้น เปลี่ยนตัวเลข Fieldbus Setpoint ค่าเป็น % คือค่าที่ต้องการให้เปิด ปิด ที่เท่าไหร่ ตั้งตัวเลขเสร็จแล้วกด OK แล้วกด ปุ่ม Bit10 Fieldbus SETPOINT เครื่องก็จะเริ่มทำงาน

17. ถ้าสั่งงานใด ๆ อยู่ใน Bit ต้องการให้หยุด ให้กดที่ปุ่ม Bit นั้นอีกที สีของปุ่มจากสีน้ำเงินจะกลายเป็นสีขาว คือการยกเลิกแล้วค่อยทำอย่างอื่นต่อ

วันพุธที่ 4 มกราคม พ.ศ. 2560

CDS : CDS Update Database

CDS : CDS Update Database เมื่อมีการเปลี่ยนแปลงฐานข้อมูล CDS จะทำการ Update Database และข้อมูลใน Table หลัก ซึ่งเราเอามาเก็บไว้ที่ SQL Server ปกติจะเก็บไว้ที่เครื่องและทำที่เครื่อง เพื่อง่ายต่อการ Backup และป้องกันข้อมูลสูญหายจึงย้ายมาไว้ที่ SQL Server
Remote ไปทำที่เครื่อง SQL Server

1. ต้อง Backup Database iXimple ก่อน โดยเข้าไปที่ SQL Server Enterprise Manager แล้วคลิ๊กขวาที่ Database iXimple เลือก All Tasks ---> Backup Database แล้วเลือก Add และเลือกที่เก็บไฟล์และตั้งชื่อไฟล์ Database ที่ Backup ให้เสร็จก่อน เผื่อมีปัญหาจะได้นำกลับมาใช้

2. เข้าไปใน Drive : C:\CDS เป็น Folder ที่สร้างขึ้นมาเพื่อ Update Database ปกติจะมีจะเฉพาะเครื่องที่ลงโปรแกรมเท่านั่น
จะได้ไฟล์ .exe จาก CDS มา เปิดไฟล์และ Extract จะได้ไฟล์ Data และ Sql ตามรูป
3. เปิดโปรแกรม SQL Query Analyzer นำ Code ในไฟล์ SQL ไปวาง หรือลากไฟล์ SQL ไปใส่ใน Database เลยก็ได้ และเลือก Database เป็น iXimple ตามรูป
รอจนกว่าจะเสร็จจะใช้เวลาสักพักหนึ่ง

4. เสร็จแล้วทำการ Shrink เพื่อให้ขนาด Database Log ของ iXimple ใน Disk E ลดลง ด้วยคำสั่ง
  1. DBCC SHRINKDATABASE(iXimple)

ใน SQL Query Analyzer ใช้เวลาไม่นาน
ดู Log ของ Database ใน จะลดลงจาก 900 Mb เหลือ 1 Mb

เสร็จการ Update Database CDS

วันอังคารที่ 3 มกราคม พ.ศ. 2560

บันทึกช่วยจำ : กล้องไม่บันทึก บันทึกเป็นบางตัว แต่ดู Real Time ได้ปกติ

บันทึกช่วยจำ : กล้องไม่บันทึก บันทึกเป็นบางตัว แต่ดู Real Time ได้ปกติ

*** ต้องเข้าไป Setup Wizard ของกล้องตัวนั้น ๆ ที่ไม่บันทึก
- แล้ว ติ๊ก Disable กล้องตัวนั้นไปก่อน
- แล้วค่อยเข้าไป ติ๊ก Enable ใหม่

น่าจะเกิดจากโปรแกรมมันเช็ค Status การ Enable และ Disable ของกล้องค้างทำให้มันไม่บันทึก

Axapta : Axapta สร้าง Periods สำหรับปีใหม่

Axapta : Axapta สร้าง Periods สำหรับปีใหม่

เข้าไปที่ Menu General ledger ---> Setup ---> Periods ---> Periods
- คลิ๊ก Create new fiscal year.
- ใส่วันที่ที่ต้องการต้นปีถึงปลายปี ใส่ period เป็น 1 เดือน ตามรูป แล้วกด OK


- เปลี่ยน Status เป็น Stop ก่อนถ้ายังไม่ปิด Invent ของปีที่แล้ว


VMware : VMware ทำงานหนักผิดปกติ

VMware : VMware ทำงานหนักผิดปกติ
- ที่ห้อง Server มีเสียงพัดลมของเครื่องดังผิดปกติต่อเนื่อง
- Network ช้า
- การเข้าใช้งาน Server ต่าง ๆ ช้า

เกิดจากมี Server หรือ Windows บางตัว Run หรือทำงานอะไรบางอย่างอยู่ทำให้ CPU ของเครื่อง VM ทำงาน 100% จึงทำให้เกิดปัญหาดังกล่าว

วิธีแก้ไข
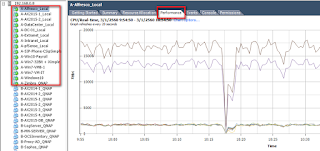
1. เข้า VSphere Client ดูที่ Tab Performance แล้วเลือก Switch To เป็น CPU จะเห็นว่า มี VMware : VMware ทำงานหนักผิดปกติ CPU ทำงาน 100% ตามรูป

2. เข้าไปไล่ดู Tab Performance และเลือก Switch To เป็น CPU จะถ้าเห็นว่าเครื่องนั้นทำงานหนักผิดปกติ ให้ไปดูที่เครื่อง เช่น
- เครื่อง Alfresco ทดลอง Restart Service ว่าลดลงหรือไม่ ถ้าไม่หายต้อง Reboot เครื่อง Alfresco
- Win10-IT มี Processes บางตัวที่ Run CPU อยู่ 100% ให้ปิดมัน
3. ถ้าปิด Processes หรือ Restart แล้ว CPU ของแต่ล่ะเครื่องจะลดลง ตามรูป

และ CPU ของเครื่อง โดยรวมก็จะทำงานลดลง พัดลมก็จะมีเสียงเบาปกติ