หน้าเว็บ

วันอังคารที่ 27 ตุลาคม พ.ศ. 2563

ตัวแปร $S_FinishDate_Edit ยัดเข้า Database

 PHP : การนำวันที่ต่อด้วยเวลาปัจจุบัน และการ Set ค่า NULL เข้าDB
รับ Get หรือ Post มาจาก Form วันที่

  1. list($dd, $mm, $yyyy) = explode("/", $_POST["S_FinishDate_Edit"]);
  2. $S_FinishDate_Edit = "'".$yyyy."-".$mm."-".$dd." ".date("h:i:s")."'";   

ตัวแปร $S_FinishDate_Edit ยัดเข้า Database

การ Set ค่า NULL ให้กับวันที่
ประกาศตัวแปรรับค่า NULL สำคัญต้องใส่ "" ด้วย
  1. $S_FinishDate_Edit = "NULL"


SQL String ไม่ต้องใส่ ' ' หรือ " " ถ้าใส่จะ Error เพราะช่องรับค่า NULL เช่น
  1. $SQL .=" `S_SectionDate`=".$S_SectionDate_Edit.",`S_DoneDate`=".$S_DoneDate_Edit.";


ตัวอย่างใน ข้อเสนอแนะตอนแก้ไข
https://intranet.sci.com/sci/suggestion/qp_start.php?YR=2020

Pi : Pi moition camera notification Line Nofity API

 Pi : Pi moition camera notification Line Nofity API
ติดตั้ง motion
https://intranet.sci.com/blog.php?u=281&b=1667

เพิ่มเติม แก้ Motion ให้ไปเรียกใช้งาน ไฟล์ python ที่สร้างขึ้นเมื่อมีการสร้าง Video

  1. nana /etc/motion/motion.conf

แก้ตรง
on_movie_start python3 /home/pi/line.py


Code pyton ส่ง Line
http://intranet.sci.com/blog.php?u=281&b=1809

Code สำเร็จ
  1. import requests, json
  2. import urllib.parse
  3. import sys
  4.  
  5. import glob
  6. import os
  7. import time
  8.  
  9. LINE_ACCESS_TOKEN = "XXXXXXX"
  10.  
  11. URL_LINE = "https://notify-api.line.me/api/notify"
  12.  
  13. def line_text(message):
  14.     msg = urllib.parse.urlencode({"message":message})
  15.     LINE_HEADERS = {'Content-Type':'application/x-www-form-urlencoded',"Authorization":"Bearer "+LINE_ACCESS_TOKEN}
  16.     session = requests.Session()
  17.     session_post = session.post(URL_LINE, headers=LINE_HEADERS, data=msg)
  18.     print(session_post.text)
  19.  
  20. def line_pic(message, path_file):
  21.     file_img = {'imageFile': open(path_file, 'rb')}
  22.     msg = ({'message': message})
  23.     LINE_HEADERS = {"Authorization":"Bearer "+LINE_ACCESS_TOKEN}
  24.     session = requests.Session()
  25.     session_post = session.post(URL_LINE, headers=LINE_HEADERS, files=file_img, data=msg)
  26.     print(session_post.text)
  27.  
  28. list_of_files = glob.glob('/home/pi/Monitor/*.jpg')
  29. latest_file = max(list_of_files, key=os.path.getctime)
  30. #print(latest_file)
  31. text_send = "Motion Detect OD."
  32. line_pic(text_send, latest_file)
  33.  
  34. #//// Delete All File In Folder Monitor ////#
  35. parth = "/home/pi/Monitor/"
  36. for i in os.listdir ( parth ):
  37.     os.remove(parth+i)

ส่งข้อความเข้า Line Bot ด้วย Sell Script ส่งหา UID ของแต่ละ User ทีละหลาย ๆ User

 ส่งข้อความเข้า Line Bot ด้วย Sell Script ส่งหา UID ของแต่ละ User ทีละหลาย ๆ User
XXX : Token Line Bot
UID = User ID Line
Code

  1. #!/bin/sh
  2. curl -v -X POST https://api.line.me/v2/bot/message/multicast \
  3. -H 'Content-Type: application/json' \
  4. -H 'Authorization: Bearer {XXX}' \
  5. -d '{
  6.     "to": ["UID","UID2","UID2"],
  7.     "messages":[
  8.         {
  9.             "type":"text",
  10.             "text":"Hello, world1"
  11.         },
  12.         {
  13.             "type":"text",
  14.             "text":"Hello, world2"
  15.         }
  16.     ]
  17. }'

Line : Python ส่งรูปเข้า Line API

 Line : Python ส่งรูปเข้า Line API
โปรแกรมที่ต้องใช้ ในเครื่อง rasberry pi
- python 3 ขึ้นไป
- ติดตั้ง

  1. pip install requests

- ติดตั้ง pip
  1. wget "https://bootstrap.pypa.io/get-pip.py"
  2. sudo python get-pip.py


1. เปิดใช้งาน Token ที่ https://notify-bot.line.me/
สามารถทำเป็น User หรือ ทำเป็น Group ก็ได้

*** สำคัญต้องเอา LINE Notify เข้าไปใน Group ด้วย ถึงจะส่งข้อความได้ ***

2. สร้าง Code python line.py
XXXX คือ Token ที่ได้จากข้อ 1.
Code
  1. import requests, json
  2. import urllib.parse
  3. import sys
  4.  
  5. LINE_ACCESS_TOKEN = "XXXX" #Use Token Or Group Token https://notify-bot.line.me/
  6.  
  7. URL_LINE = "https://notify-api.line.me/api/notify"
  8.  
  9. def line_text(message):
  10.     msg = urllib.parse.urlencode({"message":message})
  11.     LINE_HEADERS = {'Content-Type':'application/x-www-form-urlencoded',"Authorization":"Bearer "+LINE_ACCESS_TOKEN}
  12.     session = requests.Session()
  13.     session_post = session.post(URL_LINE, headers=LINE_HEADERS, data=msg)
  14.     print(session_post.text)
  15.  
  16. def line_pic(message, path_file):
  17.     file_img = {'imageFile': open(path_file, 'rb')}
  18.     msg = ({'message': message})
  19.     LINE_HEADERS = {"Authorization":"Bearer "+LINE_ACCESS_TOKEN}
  20.     session = requests.Session()
  21.     session_post = session.post(URL_LINE, headers=LINE_HEADERS, files=file_img, data=msg)
  22.     print(session_post.text)
  23.  
  24. if __name__ == "__main__":
  25.     if len(sys.argv) < 3:
  26.         # <Linux>
  27.         # python line.py "Test"
  28.         line_text(sys.argv[1])
  29.     else:
  30.         # <Linux>
  31.         # python line.py "Test" "/home/pi/test.jpg"
  32.         line_pic(sys.argv[1], sys.argv[2])


3. ทดลองส่งข้อความ
  1. python3 line_group.py "พบการเคลื่อนไหว"

จะมีข้อความแจ้ง
{"status":200,"message":"ok"}

และมีข้อความส่งไป Line

4. ส่งรูปใช้คำสั่ง
  1. python3 line.py "พบการเคลื่อนไหว" "/home/pi/3923-7.jpg"


ส่วนตัว Line Bot จะส่งได้เฉพาะรูปที่ผ่าน Link และต้องเป็น https เมื่อรูปถูกลบหรือเปลี่ยนชื่อ Line จะไม่สามารถแสดงผลรูป
ข้อจำกับ Line notify ส่งได้เดือนละ 1000 ครั้ง
https://notify-bot.line.me/doc/en/

ตัวอย่าง
https://maker.goisgo.net/raspberry-pi-w ... ne-notice/
https://medium.com/@dome.soda125/%E0%B8 ... 8ce98f0bd6
https://medium.com/dolab/blog-7-line-no ... 9724796428
https://engineering.linecorp.com/en/blo ... ad-images/

วันจันทร์ที่ 28 กันยายน พ.ศ. 2563

Axapta 2009 : Split, Export แบ่งคำด้วย String

 Axapta 2009 : Split, Export แบ่งคำด้วย String

  1. static void Job1(Args _args)
  2. {
  3.     str paramAsStr = "Value 1|Value 2|Value 3";
  4.     container paramAsCon;
  5.     int i;
  6.  
  7.     paramAsCon = str2con(paramAsStr, "|");
  8.    
  9.     for (i=1;i<=conLen(paramAsCon);i++)
  10.     {
  11.         info(conPeek(paramAsCon, i));    
  12.     }
  13. }


ส่วน Version 2012 เป็นต้นมามี Function strSplit
  1. static void Job1(Args _args)
  2. {
  3.     str paramAsStr = "Value 1|Value 2|Value 3";
  4.     List paramAsList;
  5.     ListEnumerator le;
  6.  
  7.     paramAsList = strSplit(paramAsStr, "|");
  8.    
  9.     le = paramAsList.getEnumerator();
  10.     while(le.moveNext())
  11.     {
  12.         info(le.current());    
  13.     }
  14. }

https://www.schweda.net/blog_ax.php?bid=628&wdl=en

Pi : Pi moition camera notification Line Nofity API

 Pi : Pi moition camera notification Line Nofity API
ติดตั้ง motion
https://porpramarn.blogspot.com/2019/02/pi-pi-camera-motion.html

เพิ่มเติม แก้ Motion ให้ไปเรียกใช้งาน ไฟล์ python ที่สร้างขึ้นเมื่อมีการสร้าง Video

  1. nana /etc/motion/motion.conf
แก้ตรง
on_movie_start python3 /home/pi/line.py


Code python ส่ง Line
https://porpramarn.blogspot.com/2020/09/line-python-line-api-notify.html

Code สำเร็จ

  1. import requests, json
  2. import urllib.parse
  3. import sys
  4.  
  5. import glob
  6. import os
  7. import time
  8.  
  9. LINE_ACCESS_TOKEN = "XXXXXXX"
  10.  
  11. URL_LINE = "https://notify-api.line.me/api/notify"
  12.  
  13. def line_text(message):
  14.     msg = urllib.parse.urlencode({"message":message})
  15.     LINE_HEADERS = {'Content-Type':'application/x-www-form-urlencoded',"Authorization":"Bearer "+LINE_ACCESS_TOKEN}
  16.     session = requests.Session()
  17.     session_post = session.post(URL_LINE, headers=LINE_HEADERS, data=msg)
  18.     print(session_post.text)
  19.  
  20. def line_pic(message, path_file):
  21.     file_img = {'imageFile': open(path_file, 'rb')}
  22.     msg = ({'message': message})
  23.     LINE_HEADERS = {"Authorization":"Bearer "+LINE_ACCESS_TOKEN}
  24.     session = requests.Session()
  25.     session_post = session.post(URL_LINE, headers=LINE_HEADERS, files=file_img, data=msg)
  26.     print(session_post.text)
  27.  
  28. list_of_files = glob.glob('/home/pi/Monitor/*.jpg')
  29. latest_file = max(list_of_files, key=os.path.getctime)
  30. #print(latest_file)
  31. text_send = "Motion Detect OD."
  32. line_pic(text_send, latest_file)
  33.  
  34. #//// Delete All File In Folder Monitor ////#
  35. parth = "/home/pi/Monitor/"
  36. for i in os.listdir ( parth ):
  37.     os.remove(parth+i)

Line : Python ส่งรูปเข้า Line API Notify

 Line : Python ส่งรูปเข้า Line API Notify
โปรแกรมที่ต้องใช้ ในเครื่อง rasberry pi
- python 3 ขึ้นไป
- ติดตั้ง

  1. pip install requests

- ติดตั้ง pip
  1. wget "https://bootstrap.pypa.io/get-pip.py"
  2. sudo python get-pip.py


1. เปิดใช้งาน Token ที่ https://notify-bot.line.me/
สามารถทำเป็น User หรือ ทำเป็น Group ก็ได้

2. สร้าง Code python line.py
XXXX คือ Token ที่ได้จากข้อ 1.
Code
  1. import requests, json
  2. import urllib.parse
  3. import sys
  4.  
  5. LINE_ACCESS_TOKEN = "XXXX" #Use Token Or Group Token https://notify-bot.line.me/
  6.  
  7. URL_LINE = "https://notify-api.line.me/api/notify"
  8.  
  9. def line_text(message):
  10.     msg = urllib.parse.urlencode({"message":message})
  11.     LINE_HEADERS = {'Content-Type':'application/x-www-form-urlencoded',"Authorization":"Bearer "+LINE_ACCESS_TOKEN}
  12.     session = requests.Session()
  13.     session_post = session.post(URL_LINE, headers=LINE_HEADERS, data=msg)
  14.     print(session_post.text)
  15.  
  16. def line_pic(message, path_file):
  17.     file_img = {'imageFile': open(path_file, 'rb')}
  18.     msg = ({'message': message})
  19.     LINE_HEADERS = {"Authorization":"Bearer "+LINE_ACCESS_TOKEN}
  20.     session = requests.Session()
  21.     session_post = session.post(URL_LINE, headers=LINE_HEADERS, files=file_img, data=msg)
  22.     print(session_post.text)
  23.  
  24. if __name__ == "__main__":
  25.     if len(sys.argv) < 3:
  26.         # <Linux>
  27.         # python line.py "Test"
  28.         line_text(sys.argv[1])
  29.     else:
  30.         # <Linux>
  31.         # python line.py "Test" "/home/pi/test.jpg"
  32.         line_pic(sys.argv[1], sys.argv[2])


3. ทดลองส่งข้อความ
  1. python3 line_group.py "พบการเคลื่อนไหว"

จะมีข้อความแจ้ง
{"status":200,"message":"ok"}

และมีข้อความส่งไป Line

4. ส่งรูปใช้คำสั่ง
  1. python3 line.py "พบการเคลื่อนไหว" "/home/pi/3923-7.jpg"


ส่วนตัว Line Bot จะส่งได้เฉพาะรูปที่ผ่าน Link และต้องเป็น https เมื่อรูปถูกลบหรือเปลี่ยนชื่อ Line จะไม่สามารถแสดงผลรูป
ข้อจำกับ Line notify ส่งได้เดือนละ 1000 ครั้ง
https://notify-bot.line.me/doc/en/

ตัวอย่าง
https://maker.goisgo.net/raspberry-pi-webcam-cctv-line-notice/
https://medium.com/@dome.soda125/%E0%B8%A1%E0%B8%B2%E0%B8%AA%E0%B8%A3%E0%B9%89%E0%B8%B2%E0%B8%87-line-notification-%E0%B8%94%E0%B9%89%E0%B8%A7%E0%B8%A2-python-%E0%B8%81%E0%B8%B1%E0%B8%99%E0%B9%80%E0%B8%96%E0%B8%AD%E0%B8%B0-ab8ce98f0bd6
https://medium.com/dolab/blog-7-line-notify-with-python-8c9724796428
https://engineering.linecorp.com/en/blog/using-line-notify-to-send-stickers-and-upload-images/


วันจันทร์ที่ 24 สิงหาคม พ.ศ. 2563

Axapta : การ Adjust มูลค่าของที่ Onhand เป็น 0 สามารถทำได้

 Axapta : การ Adjust มูลค่าของที่ Onhand เป็น 0 สามารถทำได้
แต่ก่อนเข้าใจว่าถ้ายอดเป็น 0 แล้วมีการ Adjust + Recall จะทำให้รายงาน Inventory ไม่มียอด Onhand แต่จะมีมูลค่า

หลังจากได้ทดลองอีกครั้ง พบว่า สามารถทำได้ เช่น 154360121003
1. หายอด Onhand ที่มียอด เป็น 0 เรียกรายงาน Inventory ไม่มียอดและมูลค่า


2. ทำการ Adjust ต้นทุนเข้าไป และเรียกรายงาน Invent จะพบมียอดเงินแต่ไม่มีของตามรูป
3. ทำการ Recalculation พบว่ามูลค่าที่ค้างอยู่หายไป
และต้นทุน Code อื่น ๆ ที่นำ Item นี้ไปใช้ ก่อน Recalculation


หลัง Call ต้นทุนที่นำ Parts ที่ Adjust ไปใช้ก็จะเปลี่ยนไป

สรุปคือ สามารถทำได้ การที่รายงาน Inventory ไม่มีของแต่มีมูลค่าอาจจะมาจากสาเหตุอื่น

วันพุธที่ 19 สิงหาคม พ.ศ. 2563

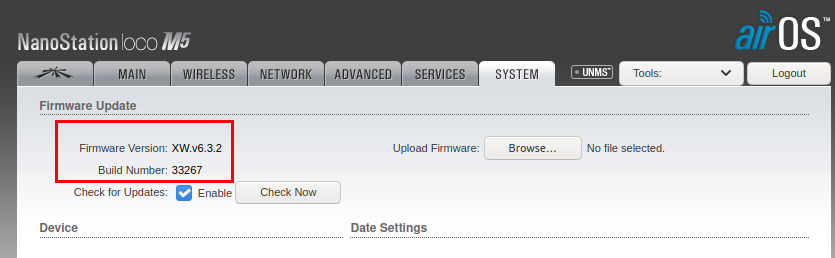
การ Update Firmware ของเครื่อง Ubiquiti loco m5 (กรณีเครื่องสามารถออก Internet ได้)

 การ Update Firmware ของเครื่อง Ubiquiti loco m5 (กรณีเครื่องสามารถออก Internet ได้)
ให้ทำเครื่อง Station ก่อน แล้วค่อยทำเครื่อง AP เพราะจะหลุดเพื่อเข้าไม่ได้
1. เข้า Menu SYSTEM ดู Version เก่า แล้วกด Check Now


2. ที่มุมขวาล่างถ้ามี Version ใหม่จะมีขึ้นมาให้กด Update

ถ้าเป็น Version ล่าสุดแล้วจะขึ้นเป็น Last Version

 
3. รอจนกว่าจะ Download เสร็จใช้เวลาไม่นาน


4. กด agree


5. กด Update อีกครั้ง

6. รอจนกว่าจะเสร็จระหว่างนั้นห้ามปิดเครื่อง

7. รอจนกว่าจะเสร็จแล้วเครื่องจะ Reboot

8. เมื่อเสร็จ Login อีกครั้ง ตัว Version ก็จะเปลี่ยนไป

วันจันทร์ที่ 3 สิงหาคม พ.ศ. 2563

Axapta : Axapta Sales Order Invoice ไปแล้วถูกลบ Line Status จะเปลี่ยนจาก Invoice เป็น Open

Axapta : Axapta Sales Order Invoice ไปแล้วถูกลบ Line Status จะเปลี่ยนจาก Invoice เป็น Open
เช่น SO20-221 ฝบง. Post Invoice ไปแล้ว แต่มีการลบและแก้ไข Line ใหม่ ทำให้ Status ของ Sales Order เปลี่ยน แต่ Transaction เกิดไปแล้ว
ใช้วิธี Reinsert จาก Database Logs ไม่ได้ Error Lot ID is not specified.


วิธีแก้
1. ให้ งสข. ใส่ Item ที่ลบไปและข้อมูลใน Line เหมือนเดิม
2. ลอกข้อมูลจาก Database จาก Local ที่จะต้องแก้มี
SalesLine, SalesTable แก้ข้อมูลเหมือนเหมือนกับ Local (จด InventTransID ไว้ด้วยสำหรับไปลบ Transaction ออก)
3. ลบ ข้อมูลใน Table Inventtrans ออก ใช้ TransId จากข้อ 2.
4. Run Job recalcInventSum เพื่อให้ Update Onhand จำนวนจะได้ถูกต้อง

วันอังคารที่ 14 กรกฎาคม พ.ศ. 2563

FreeNas : FreeNas SMB Ldap Login Shared Samba

FreeNas : FreeNas SMB Ldap Login Shared Samba
ตั้งค่า
1. Storage --> Pool สร้าง HOME
2. Directory Services ตั้งค่า AD
2.1. Active Directory
2.2. LDAP

2.3. Kerberos Realms


3. Sharing --> Windows Shares (SMB) ตั้งค่า Folder Shared จาก Home ที่สร้างไว้ในข้อ 1


4. Services --> SMB Stop แล้ว Start ใหม่

วันพุธที่ 8 กรกฎาคม พ.ศ. 2563

Axapta : Error Post PO Invoice ไม่ผ่าน

Axapta : Error Post PO Invoice ไม่ผ่าน
Error
Summary account for vendor account in posting profile default does no exist.

เกิดจาก
ร้านสร้างขึ้นมาให้เลือก Group ที่ไม่มี Default Profile ทำให้ Error ดังกว่า
ที่ Vendor
ที่ PO Go to main ที่ Default Profile จะมี Group ที่เลือกใน Vendor

ต้องให้ทาง บัญชี Group ที่ Profile ไม่มีให้ แล้วค่อย Post PO

Datacenter ขยาย Partition Disk ได้แค่ 2 TB

Datacenter ขยาย Partition Disk ได้แค่ 2 TB
นำ Disk ไปขยาย Partition แล้ว Error ขยายไม่ได้
libparted messages (ERROR)
partition length of เลขขนาดที่ต้องการขยาย sectors exceeds the msdos-partition-table-imposed maximum of เลขขนาดที่ Disk รับได้

เนื่องจาก Disk ของ Datacenter เป็น ชนิด MBR จึงได้ขนาดสูงสุดแค่ 2 TB ทำให้เกิด Error ดังกล่าว
วิธีเช็คว่า Disk เป็น MBR หรือ GPT
1. ติดตั้ง gdisk
  1. apt-get install gdisk

2. ใช้คำสั่ง
gdisk -l /dev/XXX dev ที่ต้องการ เช่น
  1. gdisk -l /dev/sdc

VMware : VMware ไม่ Boot เข้า CD

VMware : VMware ไม่ Boot เข้า CD
เกิดจากการเพิ่ม Disk แล้ว Bios ของ VM Set ให้ Boot เข้า Disk ก่อน ทำให้ไม่ Boot CD

วิธีแก้

1. Edit VMware ที่ไม่ Boot เข้า CD
ที่ Tab VM Options ทำเครื่องหมายถูกที่ Force BIOS Setup ตามรูป เพื่อให้ Boot เข้า Bios
2. ตั้งค่า Bios ให้ Boot จาก CD ก่อน แล้ว Save


เครื่องก็จะ Boot เข้า CD

วันเสาร์ที่ 4 กรกฎาคม พ.ศ. 2563

โปรแกรม MasterTime มีปัญหา ขึ้นวันที่ ซ้ำกัน

โปรแกรม MasterTime มีปัญหา ขึ้นวันที่ ซ้ำกัน ปกติรหัสหนึ่งคนใน 1 วันจะขึ้นแค่วันเดียว
แต่พบปัญหาขึ้นวันเดียวกัน 2 วัน ทำให้ข้อมูลไม่ถูกต้อง
ลบในตัวโปรแกรมไม่มีที่ลบ จึงต้องทำ VB ที่ Connect ผ่าน ODBC เข้าไปลบข้อมูลในฐานข้อมูลชื่อ _daily
วิธีแก้
1. Backup ข้อมูลก่อนทำ ปิดโปรแกรม MasterTime เพื่อไม่ให้ Lock Database
2. Run Program MT ที่เขียนขึ้น เข้า Tab ลบข้อมูลผิด ใส่รหัสพนักงาน ใส่วันที่ที่มีข้อมูลผิด กด ลบข้อมูล
3. กด OK
4. ลบแล้วแต่ไฟล์ Database ข้อมูลยังมีอยู่ วิธีแก้ต้องซ่อม Database ในตัวโปรแกรม MasterTime ก่อน ข้อมูลจึงจะถูกลบจริง
ซ่อมเฉพาะ _daily ก็ได้
5. ใช้ไฟล์ Text เดิมหลอกเพิ่มวันที่ และรหัสพนักงานที่ต้องการ แล้วคีย์ข้อมูลใหม่
Code ลบ
  1.        If EmpID.TextLength <> 5 Then
  2.             MessageBox.Show("รหัสพนักงานไม่ถูกต้อง !")
  3.         Else
  4.             myConnection.ConnectionString = ConnectionString
  5.             myConnection.Open()
  6.             myCommand.Connection = myConnection
  7.  
  8.             'ConnectionString = "Provider=Microsoft.Jet.odbc.4.0;" & "Data Source=C:\MasterTech\mastertime;Extended Properties=dBase IV"
  9.             ConnectionString = "dsn=MT"
  10.             Console.WriteLine("Connecting...")
  11.  
  12.             DBaseConnection = New System.Data.Odbc.OdbcConnection(ConnectionString)
  13.             DBaseConnection.Open()
  14.  
  15.             Dim WorkDay As String = DateTimePickerDel.Value.ToString("yyyy'/'MM'/'dd")
  16.             Dim DBaseCommand As System.Data.Odbc.OdbcCommand
  17.             'Dim DBaseDataReader As System.Data.Odbc.OdbcDataReader
  18.  
  19.             SQL = "DELETE FROM _daily WHERE ID_CARD ='" & EmpID.Text & "' AND WORKDAY = #" & WorkDay & "#"
  20.             'SQL = "DELETE FROM _daily WHERE ID_CARD ='" & EmpID.Text & "' AND WORKDAY LIKE #" & WorkDay & "%#"
  21.  
  22.             'SQL = "SELECT ID_CARD, WORKDAY FROM _daily  WHERE ID_CARD ='" & EmpID.Text & "' AND WORKDAY = #" & WorkDay & "#"
  23.             'SQL = "SELECT ID_CARD, WORKDAY FROM _daily WHERE ID_CARD ='" & EmpID.Text & "'"
  24.             Console.WriteLine(SQL)
  25.             DBaseCommand = New System.Data.Odbc.OdbcCommand(SQL, DBaseConnection)
  26.             'DBaseDataReader = DBaseCommand.ExecuteReader(CommandBehavior.SequentialAccess)
  27.  
  28.             'While DBaseDataReader.Read()
  29.             '    Console.WriteLine(String.Format("{0}, {1}", _
  30.             '    DBaseDataReader(0), DBaseDataReader(1)))
  31.             'End While
  32.  
  33.             DBaseCommand.ExecuteNonQuery()
  34.             myConnection.Close()
  35.             MessageBox.Show("ลบข้อมูลสำเร็จ")
  36.             Environment.Exit(0)
  37.         End If

วันพฤหัสบดีที่ 2 กรกฎาคม พ.ศ. 2563

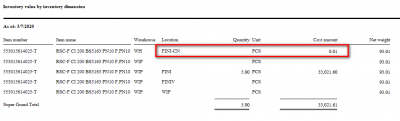
Axapta : รายงาน Invent ไม่มีของแต่มียอดเงินเหลือ 0.01 Item 553015614025-T

Axapta : รายงาน Invent ไม่มีของแต่มียอดเงินเหลือ 0.01 Item 553015614025-T
จากการตรวจสอบพบ
มีรายการที่โอนออกขายแล้วมูลค่าไม่เท่ากับที่โอนมา
ยอดพึ่งมาให้เห็นปัจจุบันเนื่องจากของที่ FINI-CN หมดเลยพึ่งแสดงให้เห็น ว่าไม่มีของแต่มียอด 0.01
เป็นแบบนี้ไม่สามารถ Adjust โดย Transaction ปกติได้ เพราะเป็นยอดนานมาแล้ว และไม่มี Onhand รวมทั้งปิด Inventory ไปแล้ว

วิธีแก้คือต้องแก้ Transaction
1. ใช้ SQL Enterprise Manager Select ข้อมูลที่เกี่ยวข้องเพื่อแก้ไข ใช้ Item กับ InventDimID ในการหา
  1. SELECT     *
  2. FROM         INVENTTRANS
  3. WHERE     (ITEMID = '553015614025-T') AND (INVENTDIMID LIKE '%18-00077784')

2. แก้ข้อมูล Transaction ที่ไม่ถูกต้อง ที่ช่อง COSTAMOUNTADJUSTMENT และช่อง COSTAMOUNTSETTLED
จะเห็นว่ามีค่า .01 และอีกช่องเป็น -6872.15 ตามรูป
ซึ่งที่ถูกต้องควรจะเป็น ช่อง COSTAMOUNTADJUSTMENT เป็น 0 ช่อง COSTAMOUNTSETTLED เป็น -6872.15
ตามที่ยอดโอนมา จึงจะทำให้ไม่มียอดค้าง แก้ตามรูป
3. Run Code Job recalcInventSum หรือ Run Recalculation ก็ได้
  1. static void recalcInventSum(Args _args)
  2. {
  3.     ItemId                  myItemId = "553015614025-T";
  4.     InventSumRecalcItem     inventSumRecalcItem;
  5.     ;
  6.  
  7.     inventSumRecalcItem = new InventSumRecalcItem(myItemId, true, CheckFix::Fix);
  8.     inventSumRecalcItem.updatenow();
  9. }

4. จะปีการปรับปรุ่ง Inventsum ให้ถูกต้อง
5. ทดลองเรียกรายงาน Invent ยอดก็จะไม่มี

PO Post Invoice ไม่ได้ Error

PO Post Invoice ไม่ได้ Error เช่น PO20-05374 : 901228012000
Transaction is financially closed and may not be split.
You may not split mor then what is financially open.

เกิดจาก PO ทำรับมาแล้ว แต่จะทำติดลบออกเพราะ มีการเปลี่ยนแปลง Invoice และ PO ใหม่
แต่ทำไม่ได้ เพราะมีการทำ TAW01 เปลี่ยน Batch ให้เป็น 191128 แต่ใน Item --> Functions --> Edit Dimensions ยังเป็น Batch เดิม
ต้องแก้ Batch ให้เป็น Batch ที่จะใช้ ให้เหมือนกันตาม Onhand ที่เหลืออยู่
เดิมเป็น 191017 และ 191024 แก้เป็น 191128 ตามรูป
แล้วค่อยให้ งคส. ทดลองทำรับใหม่อีกครั้ง

วันพฤหัสบดีที่ 25 มิถุนายน พ.ศ. 2563

Ubuntu : Ubuntu resolv.conf nameserver เปลี่ยน

Ubuntu : Ubuntu resolv.conf nameserver เปลี่ยน ทำให้ออกเน็ตไม่ได้
ค่าเดิม
nameserver 127.0.0.53

วิธีแก้
# Use Google's public DNS servers.
nameserver 8.8.4.4
nameserver 8.8.8.8


But things change and now it’s not that simple. If you now edit /etc/resolv.conf on Ubuntu you’ll find that the edits are ephemeral. If you restart (or even hibernate) your machine then they’ll be overwritten by default content.

nameserver 127.0.0.53
search Home


This is pretty simple to fix though.
1.Install the resolvconf package.
  1. sudo apt install resolvconf


2. Edit /etc/resolvconf/resolv.conf.d/head and add the following:
  1. # Make edits to /etc/resolvconf/resolv.conf.d/head.
  2. nameserver 8.8.4.4
  3. nameserver 8.8.8.8


3. Restart the resolvconf service.
  1. /etc/init.d/resolvconf restart

Fix should be permanent.
https://datawookie.netlify.app/blog/2018/10/dns-on-ubuntu-18.04/

สร้าง QR Code ด้วย Google API

สร้าง QR Code ด้วย Google API
https://developers.google.com/chart/infographics/docs/qr_codes

Code ตัวอย่าง
$Action คือค่าข้อมูลที่เราต้องการส่งไป ตอน Save ข้อมูล จะได้ QR Code มา เมื่ออ่าน QR Code ก็จะไปทำงานใน File ตาม Link ที่กำหนด และส่งตัวแปรไปด้วย
  1. <?php
  2.     $Link = "https://intranet.scivalve.com/sci/QRCode/qr_save.php?ACTION=".$Action."&chld=L|0";
  3.     //$Link = "https://intranet.sci.com/sci/QRCode/qr_get.php?ACTION=1,3842-7,2020-06-25";
  4.     $qr = "<img src='https://chart.googleapis.com/chart?cht=qr&chs=300x300&chl=$Link' alt=''>";
  5.     echo $qr;
  6. ?>

อธิบาย Parameter ที่ส่งค่าไป
cht=qr ต้องระบุเป็น qr
chs=<width>x<height> ขนาด กว้าง x สูง ไม่ต้องใส่หน่วยใส่แค่ตัวเลข
chl=<data> ข้อความหรือ URL ที่เราต้องการทำ QR Code

Parameter เพิ่มเติม
choe=<output_encoding> การเข้ารหัสค่าเดิมเป็น UTF-8
chld=<error_correction_level>|<margin> ระดับความคลาดเคลื่อนค่าเดิมอยู่ที่ 7 %

วันอังคารที่ 23 มิถุนายน พ.ศ. 2563

Squid Error : tcp logger buffer overflowed

Squid Error : tcp logger buffer overflowed
ทำให้ใช้งานไปสักพักมีข้อความถามรหัส proxy ขึ้นมาอีก

ใช้คำสั่ง
/etc/init.d/squid status
Jun 23 13:11:58 proxy squid[969]: Squid Parent: (squid-1) process 31962 started
Jun 23 13:13:04 proxy (squid-1)[31962]: tcp logger buffer overflowed
Jun 23 13:13:04 proxy squid[969]: Squid Parent: (squid-1) process 31962 exited with status 1
Jun 23 13:13:07 proxy squid[969]: Squid Parent: (squid-1) process 32384 started
Jun 23 13:14:11 proxy (squid-1)[32384]: tcp logger buffer overflowed
Jun 23 13:14:11 proxy squid[969]: Squid Parent: (squid-1) process 32384 exited with status 1
Jun 23 13:14:14 proxy squid[969]: Squid Parent: (squid-1) process 311 started
Jun 23 13:15:03 proxy (squid-1)[311]: tcp logger buffer overflowed
Jun 23 13:15:03 proxy squid[969]: Squid Parent: (squid-1) process 311 exited with status 1
Jun 23 13:15:06 proxy squid[969]: Squid Parent: (squid-1) process 763 started

เกิดจากตัว squid ส่ง log ไปเก็บที่เครื่อง log server ไม่ได้
ตรวจสอบที่เครื่อง log server มีการย้าย Folder เก็บข้อมูลใหม่
พบว่า driver lan เปลี่ยนชื่อไป จาก eth3 เป็น eth4 ทำให้ เครื่อง log ไม่ได้ ip แก้ไขใหม่ reboot ใช้งานได้

ทดลองแก้ squid ไม่ให้ส่งไป ที่เครื่อง 192.168.2.108 ก็จะไม่มี error Mark ไว้ เมื่อ server log ใช้งานได้ตามปกติก็แก้คืนเอา Mark ออก
#Sent To Log Server.
logformat squid %tl %6tr %>a %Ss/%03Hs %<st %rm %ru %un %Sh/%<A %mt
access_log tcp:192.168.2.108:514 squid