void clicked()
{
InventTable myInventTable;
InventTrans tmpInventTrans;
InventTableModule tmpInventTableModule;
VendTable tmpVendTable;
InventBatch tmpInventBatch;
SCI_Print_Label tmpSCI_Print_Label;
DictEnum dictEnum;
int enumValue;
int i = 1;
SCI_TmpPrintLabel TableTmpPrintLabel;
//ประกาศตัวแปร
FormStringControl strUnitId, strAccountNum, strBatchnumber, strMaterial, strSalesOder;
FormRealControl realQty;
FormDateControl dateDeliveryDate;
FormComboBoxControl intLabelSheet;
//FormStringControl intLabelSheet;
str urlfile;
;
//เก็บค่าใส่ตัวแปรที่ประกาศ
realQty = element.design().control(control::Qty);
strunitId = element.design().control(control::Unit);
straccountNum = element.design().control(control::AccountNum);
strbatchnumber = element.design().control(control::InventBacth);
strmaterial = element.design().control(control::Material);
dateDeliveryDate = element.design().control(control::DateEdit);
strSalesOder = element.design().control(control::SalesOrder);
intLabelSheet = element.design().control(control::LabelSheet);
dictEnum = new DictEnum(enumnum(LabelPerSheet));
EnumValue = dictEnum.name2Value(LabelPerSheet.valueStr());
TableTmpPrintLabel.clear();
TableTmpPrintLabel.ItemId = InventTable.ItemId;
TableTmpPrintLabel.ItemName = InventTable::find(TableTmpPrintLabel.ItemId).ItemName;
//เก็บข้อมูล ลง Table
TableTmpPrintLabel.Qty = realQty.realValue();
TableTmpPrintLabel.Unit = strUnitId.valueStr();
TableTmpPrintLabel.AccountNum = strAccountNum.valueStr();
TableTmpPrintLabel.BatchNum = strBatchnumber.valueStr();
TableTmpPrintLabel.Material = strMaterial.valueStr();
TableTmpPrintLabel.DeliveryDate = dateDeliveryDate.dateValue();
TableTmpPrintLabel.SaleOrder = strSalesOder.valueStr();
//TableTmpPrintLabel.LabelSheet = intLabelSheet.;
TableTmpPrintLabel.LabelSheet = EnumValue;
TableTmpPrintLabel.insert();
Button_Save.enabled(false);
}
วันศุกร์ที่ 25 พฤศจิกายน พ.ศ. 2554

Axpta X++ : Loop call forms in Axapta.
- Code in button form Item.
- You create form name SCI_Print_Lable.
Example in Project SCI_PrintLabe.
void clicked()
{
/////// Use Call Form //////////
void PrintLabel(InventTable runInventTable){
Args args = new Args();
FormRun formRun;
;
args.name(formstr(SCI_Print_Label));
args.record(runInventTable);
//args.caller(this);
formRun = classfactory.formRunClass(args);
formRun.init();
formRun.run();
formRun.detach();
formRun.wait();
}
;
/////// Delet Data In Table. Befor insert new data. //////////
ttsbegin;
WHILE
SELECT FORUPDATE * FROM TableTmpPrintLabel
{
TableTmpPrintLabel.delete();
}
ttscommit;
/////// Loop check count seleted in line. //////////
for (myInventTable = InventTable_ds.getFirst(true) ? InventTable_ds.getFirst(true) :InventTable_ds.cursor();
myInventTable; myInventTable = InventTable_ds.getnext()){
x++;
}
if (x > 1){
i = x;
/////// Loop check count for open form. //////////
for (myInventTable = InventTable_ds.getFirst(true) ? InventTable_ds.getFirst(true) :InventTable_ds.cursor();
myInventTable; myInventTable = InventTable_ds.getnext()){
PrintLabel(myInventTable);
}
// super();
}
VB 2008 :: Code รับค่า Barcode + Enter
TextBoxBarCode ชื่อ Text ที่รับค่า จาก Barcode
Barcode มีการกำหนดค่า ให้มีการ Enter
End Sub
Barcode มีการกำหนดค่า ให้มีการ Enter
Private Sub txtbarcode_KeyDown(ByVal sender As Object, ByVal e As System.Windows.Forms.KeyEventArgs) Handles TextBoxBarCode.KeyDown
If e.KeyData = Keys.Enter Then
If Len(TextBoxBarCode.Text) = 15 Then 'เช็คครบ 15 ตัวหรือป่าวถ้าครับส่งค่าไปอีก Form
Form_Asset_Detail.connectionString = myConnectionString
Form_Asset_Detail.TextBox_Code.Text = TextBoxBarCode.Text
Form_Asset_Detail.Show()
Else ' ถ้าไม่ครับให้แจ้งเตือนว่า Code ไม่ถูฏ
MsgBox(" รหัสทรัพย์สินไม่ถูก กรุณาตรวจสอบ")
End If
End If
VB 2008 :: ลดขนาด size ของรูป ก่อนเก็บ
เป็นการลดขนาด size ไม่ได้ลดขนาดความกว้างความสูงของภาพ ครับ
**** เวลานำมาแสดงในตัวโปรแกรม VB โดยใช้ PictureBox
ให้กำหนด SizeMode เป็น StretchImage เพื่อให้รูปพอดี กับกรอบที่กำหนดไว้
ที่มา http://www.thedesilva.com/2010/01/resize-image-using-vb-net/
Dim percentResize As Double
Dim bm As New Bitmap(TextBox_URL.Text) 'ที่อยู่ Part และชื่อไฟล์ที่จะ ลดขนาด
Dim width As Integer = bm.Width - (bm.Width * percentResize) 'image width. Dim height As Integer = bm.Height - (bm.Height * percentResize) 'image height
Dim thumb As New Bitmap(width, height)
Dim g As Graphics = Graphics.FromImage(thumb)
g.InterpolationMode = Drawing2D.InterpolationMode.HighQualityBicubic
g.DrawImage(bm, New Rectangle(0, 0, width, height), New Rectangle(0, 0, bm.Width, _
bm.Height), GraphicsUnit.Pixel)
g.Dispose()
bm.Dispose()
'image path New.
'image path New.
thumb.Save(TextBox_URL.Text, _
System.Drawing.Imaging.ImageFormat.Jpeg) 'can use any image format
thumb.Dispose()
**** เวลานำมาแสดงในตัวโปรแกรม VB โดยใช้ PictureBox
ให้กำหนด SizeMode เป็น StretchImage เพื่อให้รูปพอดี กับกรอบที่กำหนดไว้
ที่มา http://www.thedesilva.com/2010/01/resize-image-using-vb-net/
วันจันทร์ที่ 14 พฤศจิกายน พ.ศ. 2554
AxaptaX++ : how to get the value of autodeclared combo box
DictEnum dictEnum;
int enumValue;
;
dictEnum = new DictEnum(enumnum(YourEnum));
EnumValue = dictEnum.name2Value(YourEnum.valueStr());
return EnumValue;
ที่มา
http://www.eggheadcafe.com/microsoft/Axapta/29969290/how-to-get-the-value-of-autodeclared-combo-box.aspx
วันศุกร์ที่ 28 ตุลาคม พ.ศ. 2554
วิธี Download Clip VDO จาก Youtube โดย Google Chrome + Chrome YouTube Downloader
วิธี Download Clip VDO จาก Youtube โดย Google Chrome + Chrome YouTube Downloader

หลายๆ คนคงได้ใช้เว็บไซต์ Youtube เพื่อชม Clip Video ต่างๆ และในบางครั้งต้องการที่จะ Download ลงมาเก็บไว้ในเครื่อง เพื่อนำไปใช้งานหรือไว้ดูภายในเครื่องตัวเอง
วันนี้ผมมีวิธีการ Download Clip Video จาก Youtube ง่ายๆ โดยใช้โปรแกรมท่อง Internet ที่ตอนนี้นิยมกันใช้งานอยู่มาก นั้นคือ Google Chrome นั้นเอง อยากรู้แล้วใช่ไหมละ ว่าทำอย่างไร Google Chrome ถึง Download Clip Video จาก Youtube ได้ มาดูวิธีกันเลยดีกว่า
วิธีติดตั้งส่วนเสริม Chrome YouTube Downloader ให้กับ Google Chrome
ให้ใช้ Google Chrome เข้าเว็บไซต์ตาม Link นี้ : http://mandel-design.xf.cz/Chrome-Youtube-Downloader/?action=chrome
จากนั้นจะพบหน้าเว็บดังรูป คลิกที่ Install Now !
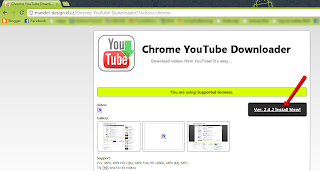
จะพบ Popup ขึ้นมาเพื่อยืนยันการติดตั้ง Chrome YouTube Downloader คลิก Install

ลองเข้าเว็บไซต์ Youtube ในหน้าที่เราดู Video ทางด้านล่างจะพบกับปุ่ม Download ให้คลิกและเลือกชนิดไฟล์ที่ต้องการ Download ได้เลยครับ
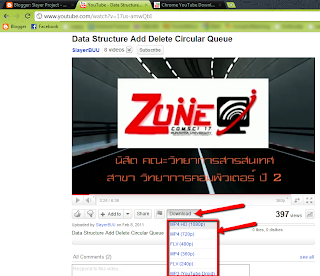
วันจันทร์ที่ 17 ตุลาคม พ.ศ. 2554
Ubuntu : how to change Login screen in Ubuntu 11.10
How to Change Login Screen – Background/Logo from Terminal
Open a terminal (Ctrl+Alt+t) and type the command (to manually edit the lightDM configuration file) -
sudo gedit /etc/lightdm/unity-greeter.conf
Then a new window will appear, where you need to provide the path for the background image.

In a similar way, you can change the default logo, by editing the just below line in unity-greeter.conf file.
Tweak LightDM appearance using ‘Simple LightDM Manager’
To install, Simple LightDM Manager, open a terminal and execute the following commands -
sudo apt-add-repository ppa:claudiocn/slm
sudo apt-get update
sudo apt-get install simple-lightdm-manager
Open a terminal (Ctrl+Alt+t) and type the command (to manually edit the lightDM configuration file) -
sudo gedit /etc/lightdm/unity-greeter.conf
Then a new window will appear, where you need to provide the path for the background image.
In a similar way, you can change the default logo, by editing the just below line in unity-greeter.conf file.
Tweak LightDM appearance using ‘Simple LightDM Manager’

To install, Simple LightDM Manager, open a terminal and execute the following commands -
sudo apt-add-repository ppa:claudiocn/slm
sudo apt-get update
sudo apt-get install simple-lightdm-manager
สมัครสมาชิก:
บทความ (Atom)